brake bias calculator
While these kits do fit these vehicles, fitment is not always direct "bolt on". Brake kits may need a conversion kit and/or modification for fitment. Search to find installation instructions.
When on, every rotor/piston/pad/tire diameter box shows millimeters (rounded to the nearest 0.1mm, or a whole number with no decimal). When off, those same boxes show decimal inches. Toggling back and forth never changes the underlying number - only how it's displayed.
Proportioning Valves
Outputs
% Calculated: 0%
% Calculated: 0%
Adjustment Recommendations
Safety disclaimer, weight distribution, center of gravity height, weight transfer under braking, suspension stiffness, kingpin inclination, tire contact patch, proportioning valves, brake line diameter, and many other factors influence your brake bias. No calculator — including this one — can determine your exact brake bias. Use the results at your own discretion and always validate them safely (on a closed course) with real-world testing.
Compare Setups
Click a "Compare" button to save the current front/rear brake setup into that row so you can compare it against other setups.
Force
Diameter
Booster
Ratio
Ratio
Diameter
Pistons
Area
Height
CoF
Increase
Diameter
Pistons
Area
Height
CoF
Increase
0.4, 0.5, 0.6 CoF pads are for race applications and CoF can vary depending on braking heat, leading to a decrease in braking performance unless at their higher operating temperatures. Consult the instructions on your specific brake pads to understand your braking CoF when cold vs hot.
Why I Built This Calculator
I searched everywhere for a brake bias calculator that could do what I needed—and couldn’t find one. So I built my own.
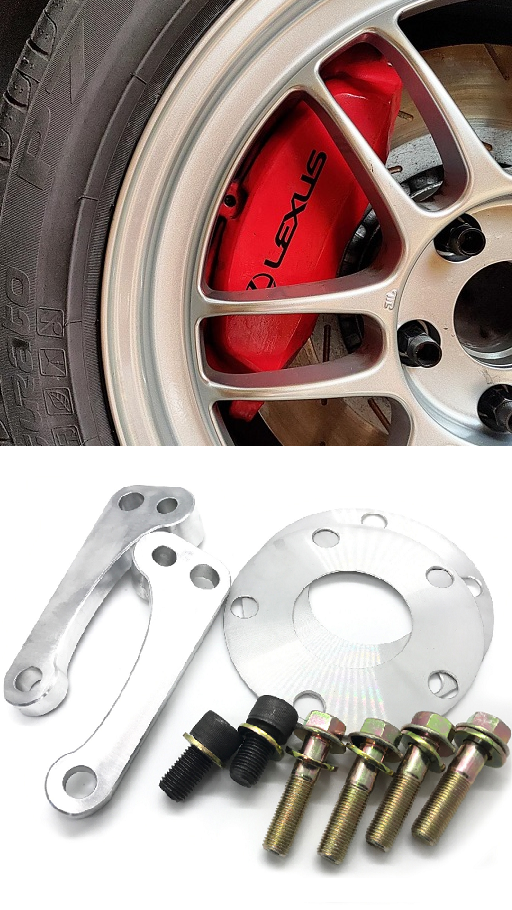
One of the main goals was the ability to compare OEM big brake kits (BBK) from other cars against each other, using larger rotor setups that I know will physically fit my car even though they were designed for different vehicles. The idea was to have a tool that I can quickly enter data into to develop a bracket that holds a larger caliper so I can run it with a larger rotor from another car. A practical example would be the IS350 front rotor and Supra TT rear rotor mounted to my IS300—each allows a larger caliper that’s held in place by a bracket. Now, if I can help others in their efforts to design custom brackets for their cars, then I’m totally down to lend my tool to the world!
In the above scenario the objective is finding the ideal brake bias so the front and rear wheels reach their maximum braking grip at the same time under hard braking. That way rear bias never exceeds front bias (leading to a fishtail) or vice versa. I also wanted to compare braking torque after converting a car to a manual booster—taking the new torque figures and stacking them against the original setup—and to determine what size brakes are needed to keep a similar or more aggressive pedal feel.
Two Types of Cars...
There are two main types of cars that can be selected in the brake preset dropdowns in this calculator. The first type of car is the type of car that you would buy, modify and then take to the track. For example, IS300, BMW 3-series, Mazda RX8, Miata, etc. These cars are commonly modified with larger brake kits as well as many other modifications. The second category of cars are some of the more high-end exotic cars whose brake kits can sometimes be found on eBay for cheap, after they’ve reached their age and are now being parted out and distributed across the world via eBay. These types of cars are a prime candidate for using the brake kits. A great example of this is the Maserati rear caliper that I have mounted to my IS300 for use with the Supra twin-turbo rear rotor. The Quattroporte rear calipers mount easily to the IS300 with the adapter bracket kit that can be purchased from PoorManMods. This assists the user in creating their own custom bracket to mount a larger caliper to a larger rotor to achieve the ideal bias set by your vehicle’s engineering team.
Comparing Brake Kits Side-by-Side
Once the tool was finished I realized how useful it is for quick kit comparisons.
If you’re looking at a $3,000 big-brake kit but you’ve found an adapter bracket online that lets you bolt on Lexus IS350 calipers and 13-inch rotors on your IS300 for a fraction of the price, you can evaluate both options directly.
Most premium kits publish the exact numbers you need. For this calculator those are:
- Rotor overall diameter
- Number of pistons on one side of the caliper (only count one half of the caliper)
- Four-piston fixed caliper (two pistons each side) → enter 2
- Two-piston floating caliper (pistons on one side only) → also enter 2
- Piston diameter(s)
- Radial pad height (sometimes the hardest figure to locate online)
See the definitions below for exactly how each measurement is taken.
Calculator Field Definitions
Rotor Diameter
The overall diameter of the rotor measured from one outer edge to the other. This is the largest dimension of the rotor—not the thickness.
How to measure rotor diameter
Piston Count
The number of pistons on one side of the caliper only. Floating calipers push on one side of the rotor and pull on the other, so two pistons effectively do the work of four. The calculator accepts both fixed and floating styles and treats them the same way: enter the number of pistons present on one side.
Fixed vs. floating caliper explanation
Piston Diameter
Many calipers use two or three different piston sizes. Sizes are always paired (identical diameter on the inner and outer sides of the rotor). Example: a six-piston 17Z may have 34 mm, 36 mm, and 38 mm pistons on one side; the opposite side carries the exact same set. This keeps clamping force even across the rotor. The smaller piston is normally placed on the leading edge of the pad.
How to measure caliper pistons
Piston Area
Displayed to the right of the piston-diameter fields. Especially useful when comparing a four-piston caliper to a six-piston caliper—you can see the total piston area of each setup side-by-side.
Radial Pad Height
The height of the brake pad measured radially—from the inner edge of the rotor outward. You can measure this yourself if you have the pad. Online it is often listed in the specifications for the piston replacement part for that caliper.
Coefficient of Friction (CoF)
A measure of how much friction a surface generates. Because brake pads are friction surfaces, their performance is expressed as a coefficient of friction. CoF changes with temperature—pads can have one value when cold and another when hot. Performance pad manufacturers usually publish these numbers on their data sheets or websites. OEM pad material is roughly 0.37 CoF.
Brake pad friction codes explained
Front / Rear Preset Dropdowns
Select any of the pre-loaded brake setups for the vehicle you chose, or switch to Manual to enter completely custom specifications.
Baseline / Compare 1 / Compare 2
Add different front or rear brake configurations to the chart so you can evaluate Option 1 or Option 2 against the baseline setup.
Leg Input Force, Master Cylinder Diameter, Booster Ratio, Pedal Ratio & Manual Booster Checkbox
Enter the basic hydraulic and mechanical details for your car. If you don’t know the exact numbers, the defaults are fine.
- Pedal ratio – Measure from the pedal pivot to the foot pad, then from the pivot to the push-rod connection. Example: 12 inches to the pad and 2 inches to the push rod = 6:1. Vacuum-boosted cars are typically around 4:1. How to measure brake pedal ratio
- Booster ratio – Usually about 4:1 for a vacuum booster; manual (hydraulic) boosters are often 6:1 or 7:1 depending on the manufacturer. Brake booster assist ratio
- Master cylinder diameter – Frequently listed in rebuild-kit documentation. Google is your friend in this situation—search for your OEM car’s brake master cylinder diameter.
Proportioning Valve
Checkboxes for front and/or rear proportioning valves. Most valves adjust up to roughly 30 %, but the calculator allows higher values. Check the box in order to enter the percentage.
How a proportioning valve works & how to adjust it
Outputs (Rotor Torque & Tire Torque – Front and Rear)
These figures are most useful when comparing kits with the Baseline / Compare 1 / Compare 2 feature so you can decide which combination suits the car best.
Bias Displays
Two values appear under the Clear All Data button:
- Your target bias (set with the slider or the entry box)
- The calculated bias produced by the front and rear kits you entered
The calculated value changes color according to how close it sits to your target. A color legend sits directly beneath the box and shows how far you are away from the front-to-rear percentage in colors (the color legend is near the bias calculated percentage).
Adjustment Recommendations
Three practical ways to move bias without swapping calipers or rotors:
- Proportioning valve + pad CoF change (check the relevant proportioning-valve box to unlock this option)
- Proportioning valve only (check the box if a valve is installed; the calculator tells you the percentage needed to hit your target)
- Brake-pad CoF change only
These are guidelines only. None of them replace real-world engineering on a specific vehicle, and none should be treated as a complete correction to the manufacturer’s intended bias.
Export to PDF
Enter a nickname for the car (or your customer’s car) and export or print the current data.